Progression goals
Ordered roadmap of progression goals derived from your SM Tracker state. Each stage is computed from your current SMs (unlocked status, rank, promo). Click a stage header to expand its checklist; click any SM in the list to jump straight to its card in the Super Managers tab.
Crystal Upgrade Planner
Max cost cap — auto-applies discount crystals to keep each level under this amount.
Or set how many crystals to use — distributed optimally to most expensive levels first.
ML income (per completion) & starting crystals — for ML rerun estimate.
Essence Planner
Essence Inventory
Enter your current on-hand essence to see surplus/deficit.
Plan your skips without leaving the hub
Enter your current barrier and FC balance to see the furthest push, the cheapest wait-then-rush route, and the full barrier-by-barrier progression.
Input Parameters
Results
Progression, rush timing, and FC balanceReady when you are
Run a calculation to see your furthest barrier, FC balance chart, wait-to-rush plan, and progression table.
Barrier Data
Raw FM barrier values, FC rewards, and breakpoint lines for free, premium, and elite paths.
Lines between barriers show the first point where you can wait to accumulate FC, then skip the rest.
Free user: 705 FC | Premium Pass: 1,205 FC | Elite Pass: 1,305 FC
Raw FM Data
Loading...| Loading data... |
|---|
| Please wait while data loads... |
How It Works
The calculator’s FC cost model, pass handling, and rush-plan logic.
How the FC cost curve works
Every barrier gets cheaper as you wait. The calculator models that drop with a power law:
That gives a smooth estimate from the full timer down to the headpiece-reduced timer, which is enough to solve both standard skip paths and partial-wait rush scenarios.
How c and p are derived
Using two known points (t_before, fc_before) and
(t_after, fc_after):
What the result includes
- Furthest push: the last barrier you can clear sequentially with your current FC.
- Rush timing: the shortest wait needed before you can skip to the end.
- FC chart: your balance after each spend and reward step.
- Progression table: the exact cost and reward breakdown for every remaining barrier.
Assumptions
- Headpiece equipped: skip costs use FC Cost After.
- Pendrives equipped: reduced timer and cost values are already reflected.
- No time jumps: ad watches, events, and other timer skips are excluded.
- Edgar is a starting bonus: selected offers are added to your starting FC immediately.
Mineshaft actives per second ALPHA
Compares cash-per-second output from Mineshaft Super Managers whose active grants cash on a fixed tick (either instant cash, or to-warehouse cash). Values pull from your SM Tracker state (level & rank). Only unlocked SMs are shown. Pick a Mineshaft element to scale each SM by its effectiveness (SE ×1.5, PE ×0.6, NVE ×0.2); Elevator and Warehouse elements further scale Sir Axiom & Vulcan's own boost by their effectiveness. Set Zoe & Cervina shaft counts directly in their rows; Cervina caps at ×100. Rows marked ~Xs* use your Shaft cycle value — override it to reflect your mineshaft worker speed.
| SM | Lv / Rank | Active | Eff. | Adj. | Interval | Duration | Per second | Include |
|---|
Introduction
First and foremost, welcome to IMT! In this guide you will find every info you need as you embark on this new and exciting journey. We will start out with ideas, tips and tricks as simple and concise as possible. As we go on, we will get into complex ideas and strategies. We will eventually dive into some math behind the scene, explaining why a certain course of action is superior to the other. Therefore, if you wonder why we do things a certain way, while you should feel free to ask, do not fret if you do not yet understand. Trust me, it will all make sense.
Starting Out
The first order of business is to get familiar with the game loop: Mineshaft (MS) produces, which is then picked up by the Elevator (E) and then eventually transported to the Warehouse (W), crediting you with the money earned. You will use that income to upgrade all 3 areas and the cycle begins again, each level not only earns but also costs more than the previous.
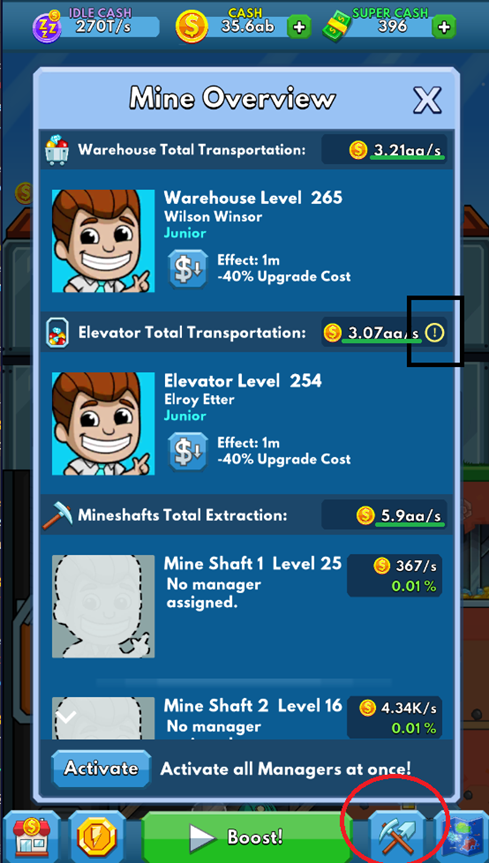
Use the Mine Overview screen often
Access the Mine Overview screen with the button near the bottom right of the screen. This menu will show you the rate at which your 3 areas are functioning. The area with the exclamation mark is the one with the lowest rate out of the three — this is your bottleneck and you should look to improve this area. The goal is to balance out all 3 numbers as much as possible. Your mine can only make as much money as your bottleneck allows it to.
Use a cost reduction manager every time you upgrade
Early game will be lenient but you should start getting into the habit of always using a cost reduction manager (if possible) as you upgrade. Why pay full price when you can get a discount?
Add friends to receive a permanent income bonus
Click on the icon near the top right corner of your screen.
It will bring up a screen where you can see your current friend bonus. You want to max this out to +100% (doubling all the income earned). Don't worry, friends in this game don't mean much, they are not going to be able to send you messages, access your sensitive information or anything like that. They are simply there for the bonus and expeditions. Therefore, what you want is to get at least 20 friends. To easily find friends, go to these links below and just add people:
- Facebook — Idle Miner Tycoon Group
- Reddit — Looking for Miners thread
- Discord — #looking-for-friends channel on the official IMT server
Use your ad Boost
At the middle bottom of your screen is a big "Boost" button. Use this frequently as it gives a tremendous boost to your income. Watching ads isn't fun, but you will be much better off watching ads than not. It's worth it!

Click the gopher often
Near the bottom area of your screen, you will often find a gopher. Tapping on him will ask you to watch an ad. In exchange, you get a lot of cash that will boost your early game progress substantially.

Collect free chests and equip your best collectible
Every 4 hours/12 hours, free common/rare chests can be claimed in the shop. They require watching an ad but especially in the early game, they give you another layer of bonus to your production. If you are lucky enough to pull epic or legendary collectibles, they can carry you well even into late game.
DO NOT prestige your Coal or Gold mine
Despite the game's recommendation, do not prestige these mines. More on why is explained in the Early Game section below.
Early Game
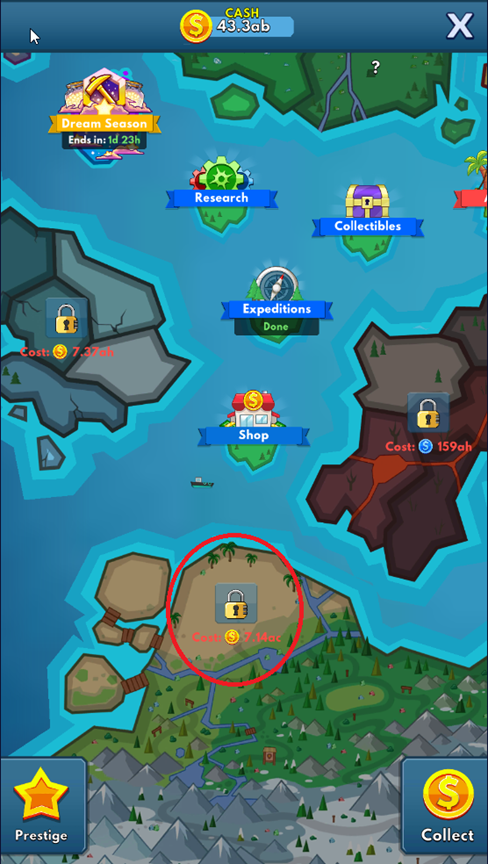
a. Mainland
As soon as you can, open Mainland. It is a collection of much easier mines designed for you to complete daily. Rewards from this continent are three types of gems — a very valuable resource to hire and upgrade Super Managers (SMs), managers that are much stronger than the normal ones. Some of them introduce new mechanics and ways to play that help tremendously with your progress.
In no time, you will receive your first manager, which is scripted to be Turner. Keep working to hire more and more SMs.
b. Continents
ONLY prestige Ruby on Start and Sapphire on Ice. On all other continents, ONLY prestige the last mine unlocked (the 5th mine). These are the highest earners in each continent. By upgrading MS, E, and W to certain milestones you will earn Super Cash (sc), the premium currency. To maximize sc income without sacrificing progression, only prestige these specific mines.
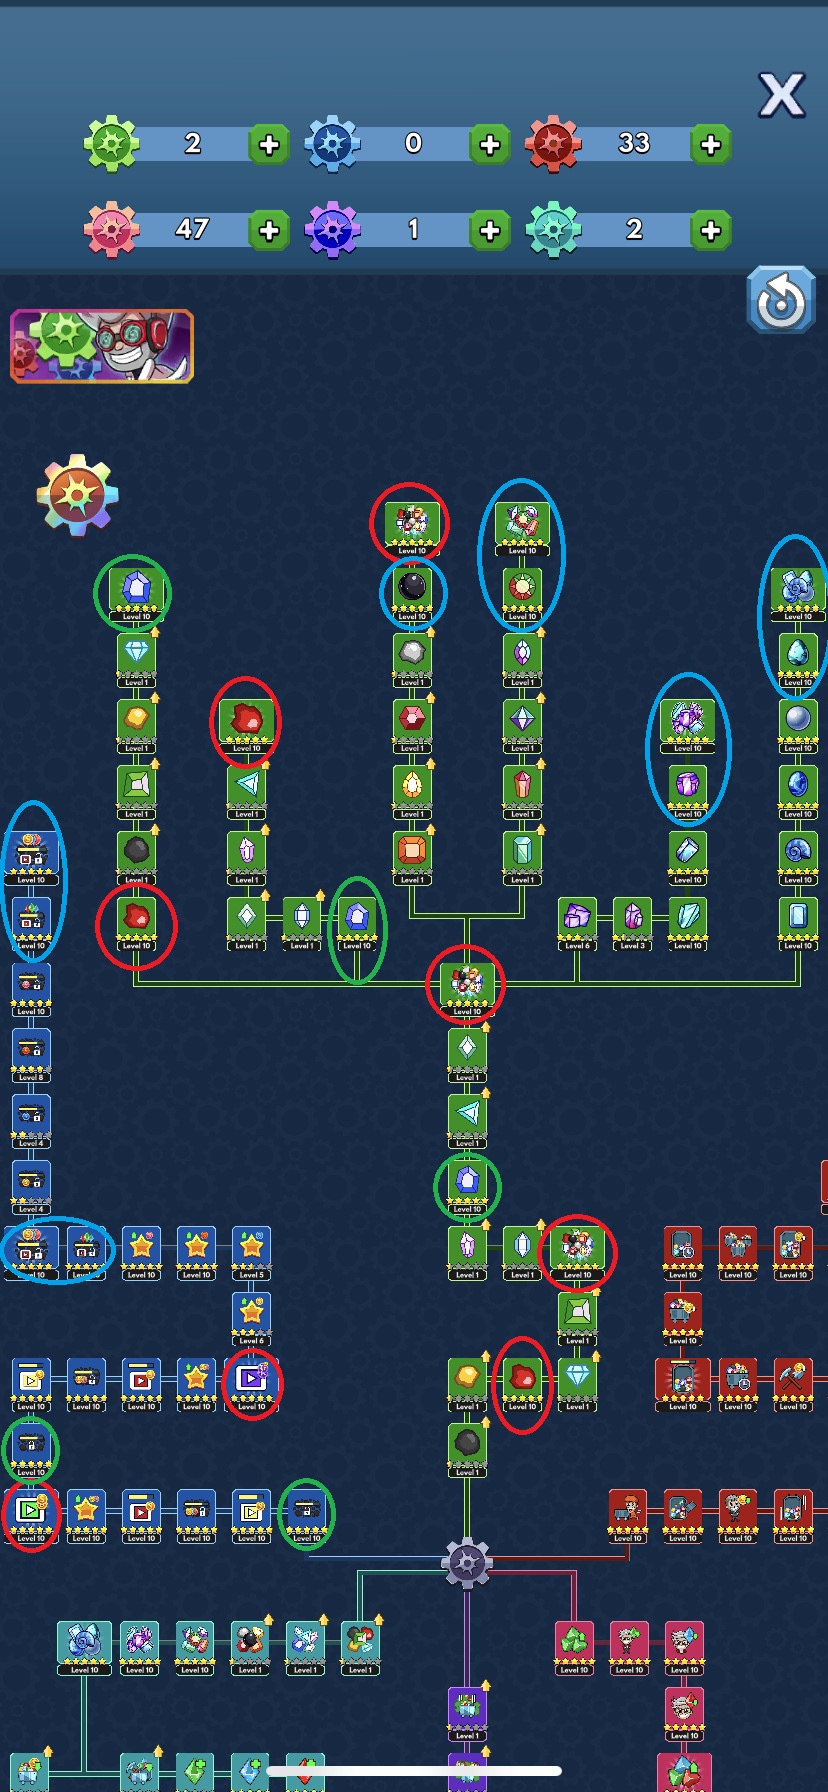
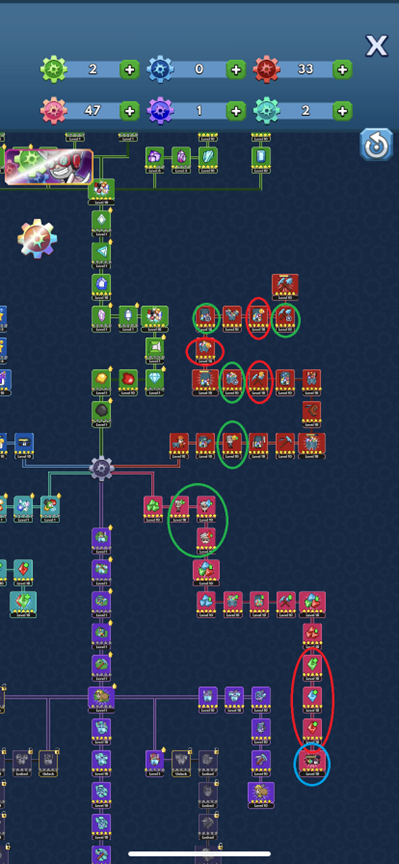
c. Research
Research priorities by color:
- Red: Extremely high priority — rush and fully upgrade ASAP
- Green: Second priority — important but not as much as red
- Blue: Beneficial but not the most important — use your judgment
 Start & Ice research priorities
 Fire & Dawn research priorities
 Dusk, Ancient & Underwater research priorities
Note 1: Why Ruby/Sapphire on Start/Ice? They are the only 2 mines with 3 income nodes on the Start tree (both toward the top left), giving each mine a whopping 100% to start with and capping out at a maximum of 161%.
Note 2: There is no specific recommendation for the Dusk branch. If you have plenty of points, open and upgrade them evenly. Eventually, focus on whichever continent you are working on.
Note 3: There is no recommendation for the Underwater branch. Both mainland and continental paths are important and it's up to personal preference. For the impossible mine path, you can respec, put points there before attempting mines, and respec back after.
Mid Game Strategies
Eventually, you will notice that you hit a barrier where it's very hard and slow to progress. Congratulations, you have arrived at Mid Game! This is where different strategies come into play. Check the Tier List to see which SMs are strongest for each strategy.
a. Balanced
What: Mineshaft Production = Elevator Transportation = Warehouse Transportation. The simplest strategy that comes naturally to any IMT player.
b. Shaft Ahead
What: Mineshaft's production is ahead, completely ignore Elevator and Warehouse.
Why/When: In continental and event mines, around E/W levels 1400, Elevator and Warehouse start getting VERY expensive. You will find out that if you were to play balanced like normal, most of your income will be going to Elevator and Warehouse. This lasts all the way until around MS30 630.
How: This is where many shaft ahead managers shine. They are special because their income depends solely on Mineshaft production, completely eliminating the need for Elevator and Warehouse. Now that you cut the majority of your unnecessary spending, you will just keep reinvesting into Mineshaft for even more money, completely ignoring Elevator and Warehouse (seriously, just pretend they don't exist). However, do note that by going shaft ahead, you will completely abandon Idle Income.
Who (highlighted being the strongest SMs in this category):
- Turner, Henry, Blingsley, Steiner, Lorenzo, Ezio (usually combined with Junior), Sue, Chester, Gordon, Wolfgang, Pebble
c. Shaft Behind (Stockpiling)
What: The most powerful and complex out of the 3 strategies.
Why/When: In continental mines, around MS30 710+, the opposite occurs: your Mineshaft gets ridiculously expensive, while your Warehouse and Elevator will be much cheaper. This lasts all the way until the end of the mine, which is MS35 800. Because Elevator and Warehouse are ridiculously cheap, you can level them much further than Mineshaft. Their transportation will exceed that of Mineshaft by a huge margin.
Let's take an example. Assume: Elevator is 12x ahead of Mineshaft's production (whatever Mineshaft produces in 1 hour, Elevator can transport in 5 minutes). Mineshaft produces 1 unit of resource per minute — over 1 hour, that's 60 units. No boost applied yet.
If you were to let that 60 units pass through Elevator and Warehouse like normal, you get 60 units of money. Plain and simple. This is where shaft behind managers like Lily shine. If you let Lily consume all of that resource during her 5 minute active (remember how our Elevator can conveniently clear all 60 units in 5 minutes too), the amount of money you would get is 60 × 3 (her active multiplier) = 180 units of money. Without any boost applied, you already earn 3 times more than you would otherwise.
Boost is where those managers shine even harder. If you pop a 10x5m to accompany Lily's 5 minute timer, you earn 180 × 10 = 1800. To achieve the same 10x income if you were to let it run through Elevator and Warehouse normally, you would need a 1 hour long boost instead. Basically, a 10x5min gives as much value as a 10x1h would. If you push Elevator and Warehouse even further than 12x, you could theoretically squeeze even more value from shorter boosts.
How: You take off Elevator managers and let resources pile up at the Mineshaft level. When it is enough for a full run of Lily, you put Lily in, activate her and then activate boost. You can put mineshaft managers in if you want, they help a bit but don't make much of a difference.
Warehouse ahead is kind of the same, but Warehouse's transportation > Mineshaft's production = Elevator's transportation. Same concept applies, but instead of letting it pile up at the Mineshaft level, you take off the Warehouse manager and let it pile up inside the Elevator instead.
Who:
- E-ahead managers: Lily, Aurora, Twins (Luna & Stellar)
- W-ahead managers: Luxario, Jade, Santa, Professor Impossible, Rayman
- MS-level Stockpiling/Preloading managers: Gordon, Chester, Sue, Wolfgang, Pebble
- E-level Stockpiling/Preloading managers: Sam Fisher, Melody, Zi, Beiro
d. Stockpile-free Shaft Behind
What: This additional strategy emerged somewhat recently as developers found a perfect way to evolve gameplay: Shaft Behind without the tediousness of stockpiling.
How: Very similar to Shaft Ahead where ONLY Elevator or Warehouse's stats matter, completely eliminating the need to worry about the other areas. As a tradeoff, their multipliers are generally much lower than the stockpile-consuming SMs.
Who:
- Stockpile-free E-ahead manager: Violet
- Stockpile-free W-ahead managers: Maple (+Luxario), Octavia
Note: Since they don't depend on other areas, the legendary SM Samantha gives them a straight multiplier upgrade without ANY drawbacks.
Super Cash & Spending
Recommended Super Cash Spending
- If you are F2P or intend to NOT spend regularly, buy legendary chests until you have at least level 3 cards in each area (MS, E and W). IMT communities usually refer to this as 3/3/3 (E/MS/W, the order they appear when you access Collectibles). However, if you intend to spend real cash regularly, you will be able to buy legendary chests at a much better rate. In this case, you still have a choice of buying legendary chests for sc, but you are better off spending sc on the next option.
- Every day, 6 fragment/token options are offered in the shop. This is the cheapest way for both F2P and payers to obtain tokens and guarantee SM fragments. The first (and sometimes the second as well) slot(s) is always free. Remember to check the shop daily.
SM fragment priority list:
- Highest Priority: Turner R3, Sue R3, Zi R3
- Medium Priority: Damian R3, Octavia, Maple, Violet, Luxario
- Low Priority: Wolfgang, Sam Fisher, Ezio
- Even Lower Priority: Marrena, Green Idler, Steiner (for their eventual level 30 promotion)
While you really should not spend your sc for anything other than the previous 2 options, if you really need to spend your sc (to reach an important threshold in Sue's event for example), buying Ancient or Underwater research points is not a terrible choice.
Recommended Real Money Options
- Permanent upgrades like no-ads and 2x forever are highly recommended. The 2x idle forever option is not as impactful but decent if you have extra cash to spare.
- A standard legendary chest deal is offered every Monday. If you are patient, occasionally there are bigger deals at a much better rate.
- Passes: Event pass is the only way to obtain batteries for crafting non-seasonal epic equipment. Nova and FM pass also offer good rates on miscellaneous items if you can progress far.
- Important SM fragments: In my personal opinion, the common and rare fragment deals are affordable, while the epic ones are unnecessarily expensive. To get epic SMs, you will be better off going with the other options. The catch is that you are at the mercy of RNG.
Event Mine, Impossible Mine & Frontier Mine
Event Mine
An event mine appears and resets every week. As you're starting out, your SM lineup will be weak. Just play for fun, get what you can and get out. Don't spend precious boosts on it. Event mine is where you're supposed to get rewards, not spend resources.
Impossible Mine
After accumulating enough Fire cash, you can unlock Impossible Mines and Forging Island. Forge keys on the island, then use them to tackle these very challenging mines for medals that unlock Legendary Super Managers.
Each legendary SM is potentially unlocked after every 3 mines. The recommendation is to wait until you have 40 keys (enough for the first 3 mines). This takes 200 days as each bronze key takes 5 days to forge. This gives you time to build up your SM lineup. However, if you're curious, it's fine to try the first mine — redoing it costs only 1 key.
Frontier Mine
One of the latest additions to IMT, FM is a biweekly series of mines where each one is progressively harder than the last. The first is suitable for any newcomer while the last is very challenging even for seasoned veterans. Enjoy the ride but don't sweat too hard — it gets easier as you improve your SM lineup.
Use the FM Calculator to plan your barrier skips and optimize your Frontier Mine runs.
Display Settings
Choose how the site looks. Auto matches your device settings and switches automatically when your OS toggles dark mode.
Adjust the text size for the entire app. Your choice is saved automatically.